
We get close to the metal as we demonstrate how you can incorporate assembly optimized SIMD routines into your Delphi apps. This can be done by using inline assembly code for Intel platforms, or by creating and linking a static library for ARM platforms.
Nowadays, with optimizing and vectorizing compilers, few people still hand-write assembly code and it is becoming a lost art. This is a bit of a shame since performance critical parts of your code can still hugely benefit from assembly optimized routines, especially if those routines can take advantage of Single Instruction, Multiple Data (SIMD) operations. SIMD, as the name implies, can perform operations on multiple pieces of data at the same time using only a single instruction.
Why?
The most advanced C(++) compilers available have support for “automatic vectorization”, and will automatically use SIMD instructions when it sees an opportunity to do so. However, those compilers are still not smart enough to outperform (or even come close to the performance of) hand-optimized routines. Delphi is not a vectorizing compiler. So if you want to take advantage of SIMD instructions, then you will have to write some assembly code.
At Grijjy, we use hand-optimized SIMD code in a couple of places, from improving the speed of camera and video capture on iOS and Android by up to a factor of 8 to optimizing the core parts of a custom video decoder. All these routines have one thing in common: they operate on large blocks of similar data (images and video). And SIMD instructions are very well suited for this.
But SIMD can be very beneficial for “smaller” problems as well. For example (warning: shameless plug follows), my personal FastMath project makes heavy use of SIMD to increase the speed of common vector and matrix operations by a factor of 4-8, and sometimes even more. This can have a big impact on math heavy 3D visualization applications and games for example.
We will just scratch the surface of SIMD assembly in this post, since this topic could easily fill many books. But hopefully it is enough to wet your appetite… or reinforce your decision to never touch a line of assembly code in your life. In the latter case, if you are in need of SIMD optimizations, then you can always (warning: even more shameless plug follows) enlist our services.
Structure of this article
Nowadays, Delphi supports 4 different CPUs: 32- and 64-bit Intel CPUs and 32-bit and 64-bit ARM CPUs. Each of these has its own assembly language and set of registers. In this post we will briefly introduce the available registers on each CPU and how they are used to pass parameters and return values. Then we show three example routines that can be optimized using SIMD instructions. We use the same three examples for all CPUs.
Most CPUs nowadays have two sets of registers and two instruction sets: one for “regular” (scalar) operations, and one for SIMD (vector) operations. Since most gains will come from using vector operations, this article mostly focuses on SIMD registers and instructions. For non-vector operations, there is little gain in using assembly code nowadays.
The code for this article is available in our JustAddCode GitHub repository. You will find it in the directory SIMDDemo. It contains a simple cross-platform application that runs the three sample routines using pure Delphi code and SIMD assembly code. It times these versions and shows how much faster the SIMD version is. It runs on Windows (32-bit and 64-bit), macOS, iOS (32-bit, 64-bit and simulator) and Android. I have not tested it on Linux since I don’t have a Linux compiler (yet).
32-bit Intel Platforms
We will start our exploration with the 32-bit Intel platform. If you are a long time Delphi programmer, you will be most familiar with this platform, and you may even have written some assembly code for it (or at least looked at it in some RTL units).
Registers
This platform offers eight 32-bit general purpose (scalar) registers called EAX, EBX, ECX, EDX, ESP, EBP, ESI and EDI. Of these, ESP and EBP are usually used to manage the stack, leaving the other six for general use. When using Delphi’s default (register) calling convention, the first three 32-bit parameters of a routine are passed in the registers EAX, ECX and EDX (in that order), and any 32-bit function result is returned in EAX. An assembly routine is free to modify the contents of the EAX, ECX and EDX registers, but must preserve the contents of the other registers.
In addition the platform offers eight 128-bit SIMD (vector) registers, sequentially numbered from XMM0 through XMM7.
These XMM registers were introduced with the SSE instruction set. This article assumes your CPU supports SSE2. This is a safe assumption nowadays, since SSE2 has been available since 2001. All 64-bit Intel CPUs support SSE2 as well.
The XMM registers can contain multiple pieces of data. For example, a single XMM register can hold 16 individual bytes, 8 individual (16-bit) words, 4 individual (32-bit) integers, 2 individual 64-bit integers, 4 individual Single values or 2 individual Double values.
Hello SIMD
Legend has it that the first program you wrote displayed the text “Hello World”. The program after that probably contained a function to add two values together. We will start here for our exploration of SIMD, but instead of adding two values together, we add 16 pairs of bytes together using a single instruction.
The Delphi version is simple enough:
type
  T16Bytes = array [0..15] of Byte;

procedure AddDelphi(const A, B: T16Bytes; out C: T16Bytes);
var
  I: Integer;
begin
  for I := 0 to 15 do
    C[I] := A[I] + B[I];
end;
We can use the inline assembler to create an SIMD version of this routine:
procedure AddSIMD(const A, B: T16Bytes; out C: T16Bytes);
//                     eax edx             ecx
asm
  movdqu  xmm0, [eax]     // Load A into xmm0
  movdqu  xmm1, [edx]     // Load B into xmm1
  paddb   xmm0, xmm1      // xmm0 := xmm0 + xmm1 (16 times)
  movdqu  [ecx], xmm0     // Store xmm0 into C
end;
All parameters of are of type T16Bytes, which is an array of 16 bytes. When the size of a parameter is greater than the size of a native integer, then passing those parameters using a const qualifier will actually pass a pointer to the value instead. For var and out parameters, Delphi will always pass a pointer (or reference).
So in this example, the address of A is passed in the EAX register, the address of B in the EDX register and the address of C in the ECX register.
The first MOVDQU instruction here reads as “move the 16 bytes starting at the address in EAX to the XMM0 register”. MOVDQU stands for MOVe Double Quadword Unaligned. A Double Quadword is a 128-bit value, so we are moving all 16 bytes. Likewise, a Quadword is a 64-bit value, a Doubleword is a 32-bit value, a Word is a 16-bit value and a Byte is an 8-bit value.
The U for Unaligned means that the source address (EAX) does not have to be aligned on a 128-bit (16-byte) boundary. If you know for a fact that that parameters are aligned to 16-byte boundaries, then you can use MOVDQA instead, where the A stands for Aligned. This improves performance a bit (but will result in an Access Violation if the data is not aligned). But since it is hard to manually align values in Delphi, you usually want to use MOVDQU instead.
The second MOVDQU instruction does the same and loads B into XMM1.
Next, the PADDB instruction adds the 16 bytes in XMM0 to the 16 bytes in XMM1 and stores the result in XMM0. PADDB stands for Packed ADD Bytes. Most SIMD instructions that work on integer values start with P for Packed, indicating it operates on multiple values at the same time. The B suffix means we are adding bytes together. If we wanted to treat the XMM registers as containing eight 16-bit Word values instead, then we would use the PADDW instruction.
The last line uses MOVDQU again to store the result in C.
On my Windows machine, the SIMD version is 7-10 times faster than the Delphi version. On my Mac, it is 16-19 times faster.
Saturation
In the previous example, when adding the bytes 100 and 200 together, the result does not fit into a byte anymore. Instead the result would “wrap around” to value 44 (= 300 mod 256). To avoid this, you would either have to store the result in a wider data type (like a Word), or saturate (clamp) it. Both options are very common in multi-media applications. We show how to implement the second option here.
In Delphi, it would look like this:
procedure AddAndSaturateDelphi(const A, B: T16Bytes; out C: T16Bytes);
var
  I, Sum: Integer;
begin
  for I := 0 to 15 do
  begin
    Sum := A[I] + B[I];
    if (Sum > 255) then
      C[I] := 255
    else
      C[I] := Sum;
  end;
end;
Since this operation is so common in multi-media apps, all SIMD instruction sets have special instructions to saturate. On Intel platforms, this routine translates to:
procedure AddAndSaturateSIMD(const A, B: T16Bytes; out C: T16Bytes);
//                     eax edx             ecx
asm
  movdqu  xmm0, [eax]     // Load A into xmm0
  movdqu  xmm1, [edx]     // Load B into xmm1
  paddusb xmm0, xmm1      // xmm0 := EnsureRange(xmm0 + xmm1, 0, 255)
  movdqu  [ecx], xmm0     // Store xmm0 into C
end;
As you can see, this version looks almost identical to the previous SIMD version. The only difference is that PADDB has been replaced with PADDUSB, which stands for Packed ADD Unsigned with Saturation Bytes. It saturates to range of the data type (0..255 for usigned bytes, -128..127 for signed bytes, 0..65535 for unsigned words etc). It also works for subtraction: if the result is less than 0, it is clamped to 0.
This SIMD version is 10-14 times faster on my PC and 25-28 times faster on my Mac.
Vector Distance
The last example we will use throughout is calculating the squared distance between two 4-dimensional vectors. This is a common operation to compare distances between objects in 3D space. This example is taken from my FastMath library. Here, a 4-dimensional vector is represented using a Delphi record with 4 single-precision floating-point values:
type
  TVector4 = record
  public
    X, Y, Z, W: Single;
  end;
To calculate the squared distance between two vectors, we first subtract the two vectors and then calculate the dot project of the result. In Delphi code, it looks like this:
function DistanceSquaredDelphi(const A, B: TVector4): Single;
var
  C: TVector4;
begin
  { Subtract the two vectors }
  C.X := A.X - B.X;
  C.Y := A.Y - B.Y;
  C.Z := A.Z - B.Z;
  C.W := A.W - B.W;

  { Calculate the dot product of C x C }
  Result := (C.X * C.X) + (C.Y * C.Y) + (C.Z * C.Z) + (C.W * C.W);
end;
If you need the actual distance, then you can take the square root of the result. I did not do that in this example, because not every CPU we discuss here has a square root assembly instruction, and supporting it would make the example overly complicated. If you want to know how to calculate square roots in assembly, then take a look at the FastMath library, where it is used to calculate the true distance between vectors.
You may guess by now that the first part of the squared distance calculation is easy to do with SIMD: we can subtract the two vectors with a single instruction. Calculating the dot product takes a few more instructions though:
function DistanceSquaredSIMD(const A, B: TVector4): Single;
//                                eax edx
asm
  movups  xmm0, [eax]     // Load A into xmm0 (as 4 Singles)
  movups  xmm1, [edx]     // Load B into xmm1

  // Subtract the two vectors
  subps   xmm0, xmm1      // xmm0 := xmm0 - xmm1 (4 times)

  // Calculate dot product
  mulps   xmm0, xmm0      // W*W  Z*Z  Y*Y  X*X
  pshufd  xmm1, xmm0, $0E // --   --   W*W  Z*Z
  addps   xmm0, xmm1      // --  --  (Y*Y + W*W)  (X*X + Z*Z)
  pshufd  xmm1, xmm0, $01 // --  --  --           (Y*Y + W*W)
  addss   xmm0, xmm1      //               (X*X + Z*Z) + (Y*Y + W*W)

  movss   [Result], xmm0  // Store result in return value
end;
Since we are working with floating-point values now instead of integer values, the names of the instructions have changed a bit. The MOVUPS (MOVe Unaligned Packed Single-Precision Floating-Point) instruction is used to load 4 Single values (an entire TVector4) into an XMM register. SUBPS (SUBtract Packed Single) is then used to subtract the two vectors using a single instruction.
Likewise, MULPS (MULtiply Packed Single) is used to multiply two vectors using a single instruction. The result is a single 128-bit register containing the squares of the X, Y, Z and W components of the vector. In memory, this vector looks like this:

Note that on little-endian machines, the first element (X) is stored in the lowest 32 bits; the next element (Y) in the next 32 bits etc. So the image above shows the values in order W, Z, Y, X.
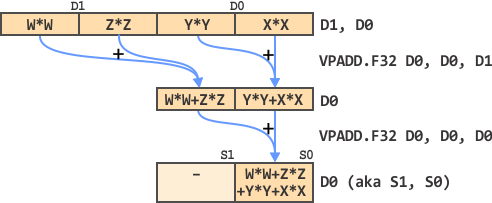
The remainder of the calculation can be visualized using this diagram:

This looks complicated, but if you read it step-by-step, top-to-bottom, it is not so bad. We start by using a PSHUFD (Packed SHUFfle Doubleword). This is one of the more complicated instructions, and one of the few Intel instructions that take 3 operands. This instruction shuffles the Doublewords (32-bit) in the second operand (XMM0) using the pattern in the third operand ($0E) and stores the result in the first operand (XMM1). The pattern describes which values from XMM0 to copy to XMM1 and in what order. Each value in XMM0 has an index, ranging from 0 (lowest, X × X) to 3 (highest, W × W). In binary, these are indices 00, 01, 10 and 11 (as noted above the rectangle in the image above).
The pattern $0E translates to binary as 00 00 11 10. Reading from right-to-left, this means that the instruction copies element 10 (2, Z × Z) of XMM0 to the lowest 32 bits of XMM1. Next, it copies element 11 (3, W × W) of XMM0 to the next 32 bits of XMM1. Finally, it copies element 00 (0, X × X) of XMM0 to the other bits of XMM1. But we don’t care about these, so we marked them with light blue lines in the image.
Next, ADDPS (ADD Packed Single) adds XMM1 to XMM0, so the lowest 32 bits contain the sum X × X+Z × Z and the next 32 bits contain the sum Y × Y+W × W. Now we need to add these two intermediate sums together.
We use the same PSHUFD trick to copy Y × Y+W × W from XMM0 to the lowest 32 bits of XMM1,using the pattern $01, which translates to 00 00 00 01 in binary. We don’t care about the other 3 elements in XMM0.
Finally, we add the results together using ADDSS (ADD Scalar Single). We could have used the ADDPS instruction as well to add 4 pairs of singles. But since we only care about a single pair, it is more efficient to use the scalar version instead.
The last line in the code uses the MOVSS (MOVe Scalar Single) instruction to move the lowest 32 bits (a scalar value) of the XMM0 register to the function result.
This example is certainly a bit more complicated and shows that you need to come up with creative solutions to combine SIMD instructions together. As you will see later, it is easier to achieve the same result using ARM assembly language.
The speed increase is moderate on my 32-bit Windows machine: the SIMD version is about two times faster on my PC and about 3 times faster on my Mac. But if we were to perform the square root operation in assembly as well (using the SQRTSS instruction), then it would be about 5-6 times faster than the corresponding Delphi version.
64-bit Intel Platforms
After this long introduction of the 32-bit Intel CPU, we can keep this section quite a bit shorter. Fortunately, the differences between 32-bit and 64-bit Intel platforms are not that big (at least, as far as we are concerned here).
Registers
In 64-bit mode, you can use the same registers as in 32-bit mode. Each general purpose register also comes in a 64-bit variant. They are RAX, RBX, RCX, RDX, RSP, RBP, RSI and RDI. The lowest 32 bits of these registers can be accessed as EAX, EBX, ECX etc. You also get 8 additional 64-bit registers called R8-R15 (the lowest 32 bits of which can be accessed as R8D-R15D).
Actually, you can also access just the lowest 16 bits of these registers as AX, BX, CX etc. Or just the lowest 8 bits as AL, BL, CL etc. You even have AH, BH, CH etc, to access the upper 8 bits of AX, BX, CX etc.
You also have access to the same SIMD (vector) registers as in 32-bit mode. But you have 8 more of them in 64-bit mode, called XMM8-XMM15.
Delphi uses Microsoft’s x64 calling convention in 64-bit mode. This means that the first four integral arguments that fit into 1, 2, 4 or 8 bytes are passed in the registers RCX, RDX, R8 and R9 (in that order). The first four floating-point arguments are passed in XMM0-XMM3. Integral function results are returned in RAX. Floating-point function results are returned in XMM0. An assembly routine must preserve the contents of registers RDI, RSI, RBX, RBP, RSP, R12-R15 and XMM6-XMM15. All other registers can be freely modified.
Sample Routines
So the sample routines on 64-bit Intel look very similar to the 32-bit versions. It suffices to only show the 64-bit version of AddSIMD here:
procedure AddSIMD(const A, B: T16Bytes; out C: T16Bytes);
//                     rcx rdx              r8
asm
  movdqu  xmm0, [rcx]   // Load A into xmm0
  movdqu  xmm1, [rdx]   // Load B into xmm1
  paddb   xmm0, xmm1    // xmm0 := xmm0 + xmm1 (16 times)
  movdqu  [r8], xmm0    // Store xmm0 into C
end;
The only difference is the use of the RCX, RDX and R8 registers to pass parameters (instead of EAX, EDX and ECX).
The speed gains are similar to the 32-bit versions, with the exception of the squared distance function. For that function, the SIMD version is about 8 times faster than the Delphi version (compared to 2 times faster in 32-bit mode).
Arm NEON
If your head isn’t spinning yet, then we can move on to the ARM platform. If your head is spinning, then take a break and promise to come back later…
On 32-bit ARM processors, the vector instruction set is called NEON. You may find that NEON programming is easier than Intel assembly programming. This is in part because you have more registers at your disposal (so you don’t need to store temporary results on the stack as much). Also, many times, the NEON instruction set is easier to use IMHO. For example, there usually is no need for the more complicated shuffle instructions (like PSHUFD or similar Intel instructions).
Registers
You have access to 16 general purpose registers called R0-R15. Registers R13-R15 have special meaning. R13 is also available under the alias SP and serves as a stack pointer. R14 is also called LR and used as Link Register. When you call a function on ARM, the return address is stored in this register. (This differs from Intel CPUs, where the return address is stored on the stack). Finally, R15 is also known as PC, or Program Counter. Assigning the value of LR to PC will exit the function and return to the address in LR.
For ARM CPUs, Delphi uses the cdecl calling convention. This means that up to 4 parameters are passed in registers R0-R3, and any other parameters are passed on the stack. The function result is stored in R0. An assembly function must preserve the contents of registers R4-R11. It can freely modify R0-R3 and R12.
In addition, you have access to 16 128-bit SIMD (vector) registers called Q0-Q15. These registers are also available as 32 64-bit registers called D0-D31. The D-registers shadow the Q-registers. This means that D0 is a shadow for the lower 64 bits of Q0 and D1 is a shadow for the upper 64 bits of Q0. Changing D0 or D1 will change the value of Q0 and vice versa. Likewise, D2 and D3 occupy the same space as Q1, D4 and D5 are part of Q2 etc.
Similarly, registers D0-D15 can also be accessed as 32 32-bit floating-point registers called S0-S31. D0 shadows registers S0 and S1, and D1 shadows registers S2 and S3 etc.
An assembly function must preserve registers Q4-Q7 (aka D8-D15). It can freely modify registers Q0-Q3 (aka D0-D7) and Q8-Q15 (aka D16-D31).
Like the XMM registers on Intel platforms, these vector registers can contain multiple pieces of data.
Adding with NEON
If Delphi would support inline assembly for ARM platforms, then the AddSIMD procedure would look like this:
procedure AddSIMD(const A, B: T16Bytes; out C: T16Bytes); cdecl;
//                      r0 r1               r2
asm
  vld1.8      {q0}, [r0]     // Load A into q0
  vld1.8      {q1}, [r1]     // Load B into q1
  vadd.u8     q2, q0, q1     // q2 := q0 + q1 (16 times)
  vst1.8      {q2}, [r2]     // Store q2 into C
end;
As you can see, every instruction consists of two parts: a mnemonic name, followed by a period and datatype. For example, u8 means that the instruction works on 8-bit unsigned integers. Another example is s32 for signed 32-bit integers. If it doesn’t matter if the type is signed or unsigned, then you can skip the “s” or “u”.
The first line uses the VLD1 instruction, which stands for Vector LoaD 1. The 1 means that elements are loaded sequentially. All instructions that operate on SIMD vectors start with “V”.
There is also
VLD2,VLD3andVLD4, which loads (deinterleaves) every 2nd, 3rd or 4th element. This is very useful for unpacking stereo channels in an audio stream for example, or to extract R, G, B and A components in a bitmap.
The first operand to VLD is a list of destination registers in curly braces. The source address is in the second operand in square brackets. So the first line reads as “Load the 16 bytes starting at address R0 into register Q0“. The second line loads parameter B into Q1.
Next, the VADD.U8 instruction adds the bytes (U8) in Q0 to those in Q1 and stores the result in Q2. Unlike Intel, most ARM arithmetic instructions have 3 operands: the first is a destination register and the second and third are source registers.
The last line stores the result (Q2) into the C parameter. Note that, also unlike Intel, the operand order for VST (Vector STore) is the same as for VLD.
Building a Static Library for Android
Unfortunately, Delphi does not support inline assembly for the ARM platform. So you need to create a library with the assembly code, and link that library into the Delphi executable. On Android you can use both static and dynamic (shared) libraries. I find it easiest to use a static library since you don’t have to worry about deploying a dynamic library. iOS does not support custom dynamic libraries, so you must use a static library. We show how to do that later in this article.
To start, you need to create a text file with the assembly routines. This file must have an “.S” extension. You must use an uppercase S, or some compilers will not recognize it as an assembly file. The file could look like this:
#if ANDROID
    .arch armv7-a
    .fpu neon
#endif

    .text
    .align 4

    .globl add_simd

add_simd: // (const A, B: T16Bytes; out C: T16Bytes);
          //        r0 r1               r2
    vld1.8      {q0}, [r0]     // Load A into q0
    vld1.8      {q1}, [r1]     // Load B into q1
    vadd.u8     q2, q0, q1     // q2 := q0 + q1 (16 times)
    vst1.8      {q2}, [r2]     // Store q2 into C
    bx          lr             // Return
In our SIMDDemo project on GitHub, you can find the assembly routines in the file “simd_32.S” in the “Source\Arm\Arm32” directory.
The top part of this file is boilerplate. The #if ANDROID section is to tell the compiler that it should generate armv7-a code and enable NEON. These instructions are not needed for iOS. The interesting part starts at the .globl line. The .globl directive is used to tell the linker which symbols it should make global, so you can link to them from Delphi. The function itself starts with the name of this symbol, followed by a colon. You will find the same instructions here as in the code before. The difference is the last line “BX LR” which reads as Branch eXchange to LR, or goto the address stored in the Link Return register. This is one of the ARM ways to return from a function. (The eXchange part tells the CPU to switch Thumb state, which is outside the scope of this article).
Using NDK-build
Now, to create a static library for this file, I find it easiest the use the NDK-build tool, which is part of the Android NDK. You should have installed this NDK when you installed Delphi. This tool requires a specific directory structure (look at the “libsimd-android” directory in the repository for an example). You must have a directory called “jni” (for Java Native Interface). Inside this directory, you must create two text files.
The first one must be called “Android.mk” and contains instructions for the compiler and linker. For our example, this file looks like this:
LOCAL_PATH:= $(call my-dir)/../../Arm32
include $(CLEAR_VARS)

LOCAL_MODULE    := simd-android
LOCAL_SRC_FILES := simd_32.S

include $(BUILD_STATIC_LIBRARY)
Don’t worry about the details too much. You can always look up the specification for the syntax of this file. Basically, the first line sets the working directory. The $(call my-dir) variable returns the name of the directory this file (Android.mk) is in. In our example, the source code is two directory levels up from here, in the “Arm32” subdirectory.
LOCAL_MODULE specifies the name of the static library to generate. NDK-build will prefix this with “lib” and add a “.a” extension, so the final static library will be called “libsimd-android.a”.
Next, LOCAL_SRC_FILES contains a space separated list of source files to compile. Finally, include $(BUILD_STATIC_LIBRARY) tells the linker to output a static library (use BUILD_SHARED_LIBRARY to build a dynamic library instead).
The other file you need to create in the “jni” directory is called “Application.mk”, and is used to configure the output. It looks like this for our example:
APP_ABI := armeabi-v7a
APP_PLATFORM := android-8
APP_OPTIM := release
This is mostly boilerplate, and you can use it for all static libraries for use with Delphi. It tells the build tool for what platform and ABI (Application Binary Interface) it should generate the library, and that it should optimize the code for a release build.
Now, all you need to do is open a command prompt in the “jni” directory and run ndk-build. This will generate the static library in the “obj\local\armeabi-v7a” subdirectory. However, you probably don’t have ndk-build somewhere in your path. So I created a batch file in the “jni” directory that tries to find NDK-build using the registry, call it, and copy the resulting static library to the directory with the Delphi sources. You can find this batch file in the repository.
Link to the library in Delphi
Now that we have the static library, we can link to it from Delphi like this:
procedure add_simd(A, B, C: Pointer);
  cdecl; external 'libsimd-android.a';
A couple of things to note here:
- You will notice that the 3 parameters are of pointer types here instead of
T16Bytes. Normally, when usingconstparameters with records or static arrays, Delphi will implicit convert these to pointers behind the scenes. However, depending on the size of the parameter, that does not always work on ARM platforms, so it is safest to explicitly declare the parameters as pointers. - The
externaldirective tells Delphi in which static library it can find the function. You probably want to make this a constant, since the name will be different for iOS.
Then, to actually call this routine, we wrap it inside a regular inlined Delphi routine:
procedure AddSIMD(const A, B: T16Bytes; out C: T16Bytes); inline;
begin
  add_simd(@A, @B, @C);
end;
Because this procedure is inlined, the extra procedure call overhead is avoided.
Now we can finally run the test on an Android device. On my Android phone, the NEON version is about 10-12 times faster than the Delphi version.
Add and Saturate (NEON)
Next we look at how to convert the two other sample routines to NEON. The first, AddAndSaturateSIMD is easy and looks almost the same as AddSIMD:
add_and_saturate_simd: // (const A, B: T16Bytes; out C: T16Bytes);
                       //        r0 r1               r2
    vld1.8      {q0}, [r0]     // Load A into q0
    vld1.8      {q1}, [r1]     // Load B into q1
    vqadd.u8    q2, q0, q1     // q2 := EnsureRange(q0 + q1, 0, 255)
    vst1.8      {q2}, [r2]     // Store q2 into C
    bx          lr             // Return
The only difference is that the VADD.U8 instruction has been replaced with VQADD.U8. The additional Q is used to indicate that the instruction will saturate.
This NEON routine is a whopping 20 times faster than the Delphi version!
Vector Distance (NEON)
The function to compute the squared distance between two vectors is a bit more complex, but easier than the Intel version:
distance_squared_simd: // (const A, B: TVector4): Single;
                       //        r0 r1            r0
    vld1.32     {q0}, [r0]     // Load A into q0 (as 4 Singles)
    vld1.32     {q1}, [r1]     // Load B into q1

    // Subtract the two vectors
    vsub.f32    q0, q0, q1     // q0 := q0 - q1 (4 times)

    // Calculate dot product
    vmul.f32    q0, q0, q0     // W*W  Z*Z  Y*Y  X*X
    vpadd.f32   d0, d0, d1     // (W*W + Z*Z) (Y*Y + X*X)
    vpadd.f32   d0, d0, d0     // -- (W*W + Z*Z) + (Y*Y + X*X)

    vmov.f32    r0, s0         // Store result in r0
    bx          lr             // Return
Subtracting the two vectors is easy, and is done with the VSUB instruction, as you may have guessed. The .F32 suffix indicates that the instruction operates on 32-bit floating-point values (known as Single in Delphi).
Also, not surprisingly, VMUL.F32 is used to multiply the result and store it in the Q0 register. In memory, the result looks like this:

This is identical to the layout of the XMM0 register discussed earlier in the Intel section. Here, you can clearly see that register Q0 shadows registers D0 and D1.
The remainder of the calculation can be visualized as follows:
You will agree that this looks easier than the corresponding diagram on the Intel platform. VPADD stands for Vector Pairwise ADD. It adds together neighboring pairs of values (without the need to shuffle them). The first VPADD instruction adds the pairs in D0 and D1 together and stores the result in D0. The second VPADD does the same, but we only care about the one remaining pair, so the third operand can be anything (we choose D0 in this case).
So the final dot product is stored in the lower 32 bits of D0. Since D0 shadows floating-point registers S0 and S1, this means that the dot product is available in S0.
The VMOV.F32 instruction at the end copies the S0 register to the R0 register, which is used for function results.
On my Android phone, this version is about 4 times faster than the Delphi version.
Building a Static Library for iOS
Before we start looking into Arm64 assembly, let’s build the same static library for iOS. You will need to do this on your Mac computer. You could copy over the source files to your Mac, build the library, and copy the library back to your PC. However, it is much easier and less error-prone to share the development directory on your PC with your Mac. Then you have instant access to the source code on the Mac, and the library you build will be instantly available on your PC. Furthermore, you can do all your text editing on the PC, which you may find easier than doing that on the Mac.
Setup a shared directory
If you haven’t setup a shared directory yet, this is one way to do it:
- On your PC, select your development folder and share it. Give the share a name so you can use that name on the Mac side. The Mac should have read and write access.
- On your Mac, open Finder and choose the menu option “Go | Connect to Server…”. We are going to connect using the SMB protocol.
- Enter the server address as
"smb://[PCName]“, where[PCName]is the name of your computer. - Click the “Connect” button. Depending on how you set up your share, you may be asked to login.
- The next dialog box shows a list with folders you shared on your PC. Select the one you shared in the first step.
If you don’t want to repeat the last four steps every time you start your Mac, then you can automatically create this share when the Mac starts by performing these steps:
- Open the System Preferences and select “Users & Groups”.
- Select the current user and open the “Login Items” tab.
- Click the “+” button and navigate to your Shared PC in the finder window that pops up.
- Select the shared folder and press “Add”.
Create a build script
There are multiple ways you can create a static library for iOS. You could use Xcode to create a new “Cocoa Touch Static Library”. However, for smaller libraries, I find it easier to just create a small shell script with build instructions. This avoids having to manage, configure and version control an Xcode project.
In the accompanying repository you will find the shell script “Build.sh” in the “simd-ios” subdirectory. A script to build the current 32-bit static library for iOS could look like this:
PLATFORM="iPhoneOS"

DEVELOPER_DIR=`xcode-select -print-path`
if [ ! -d $DEVELOPER_DIR ]; then
  echo "Please set up Xcode correctly. '$DEVELOPER_DIR' is not a valid developer tools folder."
  exit 1
fi

SDK_ROOT=$DEVELOPER_DIR/Platforms/$PLATFORM.platform/Developer/SDKs/$PLATFORM.sdk
if [ ! -d $SDK_ROOT ]; then
  echo "The iOS SDK was not found in $SDK_ROOT."
  exit 1
fi

clang -c -O3 -arch armv7 -isysroot $SDK_ROOT ../Arm32/simd_32.S
ar rcs libsimd-ios.a simd_32.o
ranlib libsimd-ios.a

rm *.o
The top half is boilerplate. It is used to find your Xcode installation and the iOS SDK. The interesting part starts at the “clang” line. On this line, the Clang compiler is used to compile the “simd_32.S” assembly file into a “simd_32.o” object file.
Even though Clang is a C-family compiler, it is also used as a driver to compile (or assemble) an assembly language file.
The parameters passed to the Clang compiler tell it to use full optimization (-O3), target the armv7 architecture and use to the given iOS SDK (-sysroot $SDK_ROOT).
The next line uses the “ar” tool to convert the “simd_32.o” object file into a static library called “libsimd-ios.a”. Then the “ranlib” tool is used to build a symbol table so Delphi can find the routines to link to. Finally “rm” deletes the object files, since we don’t need them anymore.
Run the build script
You need to run the build script on your Mac. Open a terminal window and enter
cd /Volumes/[SharedFolderName]
to go to the shared folder on your PC. From there, CD to the directory containing the build script and enter:
./Build.sh
to execute the build script. You should end up with a “libsimd-ios.a” static library.
Link to the library in Delphi
Now that we have the static library, we can link to it from Delphi like this:
procedure add_simd(A, B, C: Pointer);
  cdecl; external 'libsimd-ios.a';
Unfortunately, you will get a link error because, on iOS, imported function names must start with an underscore. One way to this is by exporting functions with an underscore for iOS. We can do this by adding a macro to the assembly file:
#if ANDROID

.macro PROC ProcName
    .globl \ProcName
    \ProcName:
.endm

#else

.macro PROC ProcName
    .globl _\ProcName
    _\ProcName:
.endm

#endif
This defines a macro called PROC with a single parameter called ProcName. To reference this parameter, prefix it with a backslash. On Android, this macro defines a global with the name ProcName and starts a label for this procedure. On iOS, it prefixes the global and label with an underscore.
Now, defining an assembly function looks like this:
PROC add_simd // (const A, B: T16Bytes; out C: T16Bytes);
              //        r0 r1               r2
    vld1.8      {q0}, [r0]     // Load A into q0
    ...
This expands to the following code for iOS (notice the leading underscores):
.globl _add_simd
_add_simd: // (const A, B: T16Bytes; out C: T16Bytes);
           //        r0 r1               r2
    vld1.8      {q0}, [r0]     // Load A into q0
    ...
Now we can finally run the tests on an iOS device. The performance differences are pretty amazing. The NEON Add function is 16-21 times faster than the Delphi version on my iPad. The NEON AddAndSaturate function is an amazing 30-36 times faster and the NEON DistanceSquared function is about 13 times faster.
Arm64
Just hang in there. We have reached the final section of this post were we explore the Arm64 architecture.
Unlike Intel platforms, where the differences between 32-bit and 64-bit assembly aren’t that big, the situation on ARM platforms is different. Arm64 defines a completely new assembly language and register set, so porting 32-bit NEON assembly code to Arm64 isn’t as straightforward. Fortunately, much of the underlying principles of 32-bit ARM are kept and many differences just relate to the syntax.
Note that there is no such thing as 64-bit NEON. NEON is the vector instruction set for the 32-bit architecture. There is no fancy name for vector instructions on Arm64. They just called it “Advanced SIMD Vector Instructions”.
Registers
On Arm64, there are 31 64-bit general purpose registers called X0-X30. These registers are also available as 32-bit register using the names W0-W30. There is an additional XZR register, or Zero Register, which always has the value 0. You can use this to avoid having to clear out a register for certain calculations.
In addition, there are 32 128-bit SIMD registers, which can be used in both scalar and vector mode. In scalar mode, these are called:
- B0-B31: contain 8-bit integers.
- H0-H31: contain 16-bit integers or half-precision floating point values.
- S0-S31: contain 32-bit integers or single-precision floating point values.
- D0-D31: contain 64-bit integers or double-precision floating point values.
- Q0-Q31: contain 128-bit values.
Note that, unlike NEON, a Q-register does not map to two D-registers. That is, on Arm64, D10 contains the lower 64 bits of Q10, while with NEON, Q10 maps to D20 and D21.
In vector mode, the SIMD registers are named as follows (where n is the register number ranging from 0 to 31):
- Vn.8B: contains 8 B-values (64 bits total).
- Vn.16B: contains 16 B-values (128 bits total).
- Vn.4H: contains 4 H-values (64 bits total).
- Vn.8H: contains 8 H-values (128 bits total).
- Vn.2S: contains 2 S-values (64 bits total).
- Vn.4S: contains 4 S-values (128 bits total).
- Vn.1D: contains 1 D-value (64 bits total).
- Vn.2D: contains 2 D-values (128 bits total).
You can also access individual elements in a vector register using an index:
- Vn.B[i]: the i-th B element (i = 0..15)
- Vn.H[i]: the i-th H element (i = 0..7)
- Vn.S[i]: the i-th S element (i = 0..3)
- Vn.D[i]: the i-th D element (i = 0..1)
When calling a routine, up to 16 parameters are passed in registers. The first 8 integer or pointer parameters are passed in general purpose registers X0-X7. The first 8 vector or floating-point parameters are passed in SIMD registers V0-V7. Integer function results are returned in X0. Floating-point function results are returned in V0.
Inside an assembly function:
- Registers X0-X15 can be freely used.
- Registers X16-X18 and X29-X30 should be avoided.
- Registers X19-X28 should be preserved.
- Registers V0-V7 and V16-V31 can be freely used.
- Registers V8-V15 must be preserved (only the lowest 64 bits have to be preserved).
That gives is quite a bit of playroom.
Update the build script
We are going to put the Arm64 versions in a new assembly file called “simd_64.S”. We need to compile this file into a separate 64-bit static library. Then, for ease of use, we want to combine the 32-bit and 64-bit libraries into a single universal static library. To do this, we need to update the build script so the second half looks like this:
clang -c -O3 -arch armv7 -isysroot $SDK_ROOT ../Arm32/simd_32.S
ar rcs armv7.a *_32.o
ranlib armv7.a

clang -c -O3 -arch arm64 -isysroot $SDK_ROOT ../Arm64/simd_64.S
ar rcs arm64.a *_64.o
ranlib arm64.a

lipo -create -arch armv7 armv7.a -arch arm64 arm64.a -output ../../libsimd-ios.a
The first 3 lines are similar to the first version of the build script. They generate a 32-bit static library called “armv7.a”.
The next 3 lines do the same thing, but build a 64-bit static library called “arm64.a” instead.
Finally, the last line uses the “lipo” tool to combine the two libraries into a single universal static library called “libsimd-ios.a”.
See the repository for the full version of the build script.
Adding with Arm64
Lets start with the simple example that adds two arrays of 16 bytes together:
PROC add_simd // (const A, B: T16Bytes; out C: T16Bytes);
              //        x0 x1               x2
    ld1.16b     {v0}, [x0]     // Load A into v0
    ld1.16b     {v1}, [x1]     // Load B into v1
    add.16b     v2, v0, v1     // v2 := v0 + v1 (16 times)
    st1.16b     {v2}, [x2]     // Store v2 into C
    ret                        // Return
This looks somewhat similar to the NEON code. LD1.16B means to load 16 bytes from the address in X0 and store them in SIMD register V0. The ADD.16B and ST1.16B instructions should be no surprise by now.
I used an abbreviated syntax in the example above. As I mentioned in the “Registers” section, every SIMD register has a suffix for the data type, so the third line of code in the example should actually be this:
add v2.16b, v0.16b, v1.16bBut if the data type of all operands is the same, you can omit it from the register name and add it to the instruction name instead:
add.16b v2, v0, v1That saves a couple of keystrokes and makes it a bit easier to read.
This optimized Arm64 version is 16-23 times faster than the Delphi version on my iPad.
Add and Saturate (Arm64)
As you might expect, the AddAndSature routine is only slightly different:
PROC add_and_saturate_simd // (const A, B: T16Bytes; out C: T16Bytes);
                           //        x0 x1               x2
    ld1.16b     {v0}, [x0]     // Load A into v0
    ld1.16b     {v1}, [x1]     // Load B into v1
    uqadd.16b   v2, v0, v1     // v2 := EnsureRange(v0 + v1, 0, 255)
    st1.16b     {v2}, [x2]     // Store v2 into C
    ret                        // Return
Here the UQADD instruction is used, which stands for Unsigned saturating ADD (where again, the Q stands for saturation).
This version is 21-27 times faster than the corresponding Delphi version.
Vector Distance (Arm64)
Finally, the function to compute that squared distance between two vectors looks like this:
PROC distance_squared_simd // (const A, B: TVector4): Single;
                           //        x0 x1            v0
    ld1.4s      {v0}, [x0]     // Load A into v0 (as 4 Singles)
    ld1.4s      {v1}, [x1]     // Load B into v1

    // Subtract the two vectors
    fsub.4s     v0, v0, v1     // v0 := v0 - v1 (4 times)
    fmul.4s     v0, v0, v0     // W*W  Z*Z  Y*Y  X*X
    faddp.4s    v0, v0, v0     // --  --  (W*W + Z*Z) (Y*Y + X*X)
    faddp.4s    v0, v0, v0     // --  --  --  (W*W + Z*Z) + (Y*Y + X*X)

    // Function result is stored in lowest Single in v0
    ret                        // Return
This code uses the suffix “.4S” instead of “.16B” to indicate that we are operating on four 32-bit values at the same time. Don’t confuse the S with Single-precision floats however, since S is also used for 32-bit integers (see the section about Registers earlier). Whether we are dealing with integers or floats depends on the instruction name. If the instruction starts with an F, then it deals with floating-point values, otherwise with integer values.
So the FSUB.4S and FMUL.4S instructions subtract and multiply four floating-point values at the same time. No surprise here.
The FADDP instruction stands for Float ADD Pair. It is similar to the VPADD instruction we used for NEON. Check back on the “Vector Distance (NEON)” section if you need a refresh on how this pair-wise addition works.
Note that the V0 register is also used to return floating-point values from a function. So we don’t need to do anything special to copy the result of the calculation to a return register.
Finally, returning from a function is slightly easier in Arm64 mode. You use the RET instruction, which loads the Program Counter with the value stored in the Link Return register.
This optimized routine is about 6-10 times faster than its Delphi version.
What’s Next?
That was quite a journey. Assembly language is a big and broad subject, and I was only able to show you the very basics for all 4 CPUs that Delphi currently supports. I left out a lot of details and was not always entirely accurate as to not over-complicate things.
I don’t expect you to start assembly-programming now if you didn’t do so already. I just hope this post gives you a basic understanding of what is involved and what the possibilities and opportunities are.
If you want to get your hands dirty and learn more, then these links may be helpful:
- The Intel Architecture Software Developer Manuals.
- The ARM Architecture Reference Manuals. You need to register a (free) account to download PDF versions of these manuals.
- Alternatively, you can view on-line reference material at the ARM Information Center.
- Agner Fog has a great collection of Software Optimization Resources, mostly geared towards Intel (compatible) processors.

These hand-tuned optimizations are great, but to accommodate for new CPUs, their architectures and instruction sets like AVX, it would be great if Delphi compiler would do the proper code optimization by itself, maybe with the help with LLVM backend. For instance, VS2017 for Win32 already produces an optimal code for 4×4 matrix multiplication (see: https://godbolt.org/g/Ugvntr), which looks very close to what you have in FastMath for 32-bit, albeit some instructions in different order. LLVM seems to do it even better, so integrating LLVM for desktop platforms, and enabling proper optimizations on mobile platforms, should one of priorities in Delphi roadmaps. Until then, I think something like FastMath in Delphi projects is a definite “must-have”. Great article, thanks!
LikeLiked by 1 person
Thanks! I agree, it would be very nice if the Delphi compiler would support automatic vectorization. Delphi uses the LLVM backend for iOS, Android and Linux, but apparently does not configure it to perform vectorization, since the hand-optimized routines are much faster. I am no LLVM expert, but maybe a lot can be gained by changing the way the LLVM backend is used in Delphi (eg. by enabling additional optimization passes).
LikeLike
Thanks for the excellent blog, Erik!
LikeLiked by 1 person
Erik , can you just show a little code on how tospeed of camera and video capture on iOS and Android ?
Again so many thanks for this great course .
LikeLike
I posted a bug report/feature request for this back in 2015:
https://quality.embarcadero.com/browse/RSP-10592
The report includes a test project and some units to speed up the capture process. It includes static libraries with SIMD code for iOS and Android.
Since then, Ypipeng Zhao has updated the code to make it compatible with Delphi Berlin:
https://github.com/zhaoyipeng/DelphiDemos/tree/master/CameraPerformance
That should help you get started…
LikeLike
This is the easiest way i could find to understand Assembly. Great Work and nice illustrations!
Great post, very informative. I wonder why the other experts of this sector don’t notice this. You should continue your writing. I’m sure, you’ve a great readers’ base already!
LikeLike
Thanks! I’m happy you liked it. Starting with assembly language is always hard. Many assembly tutorials cover “regular” (scalar, non-SIMD) assembly language, which I don’t find very interesting because the compiler takes care of generating this code and you don’t gain much by hand coding this in assembly. It becomes interesting when you need vectorization (SIMD) for a real performance boost…
LikeLike
Really really nice comment. It would be great if you wrote a second part about vectorization. I think is a subject very important but there is few information about how do it by oneself.
LikeLiked by 1 person
Thanks! I may write a follow up post, but I don’t know if there would be much interest for it in the Delphi community. In the meantime, you can take a look at my FastMath project (https://github.com/neslib/FastMath). Most assembly routines in that project are documented, so it can be used as a resource…
LikeLike
Great article! Is possible using SIMD take a better Pascal position in this benchmark? https://benchmarksgame-team.pages.debian.net/benchmarksgame/performance/nbody.html
Need double-precision floating-point arithmetic. You recommend some learning material about this?
LikeLike
Thanks! I’m sure SIMD can be used to improve the benchmark, but then it wouldn’t be Pascal/Delphi anymore that you are comparing.
You can take a look at my FastMath library (https://github.com/neslib/FastMath) for SIMD accelerated math. Only single-precision though (currently). But once you master the assembly concepts, moving to double-precision should be relatively easy…
LikeLike
you’ve got a little error in: 32-bit Intel Platforms – Registers:
… are passed in the registers EAX, ECX and EDX (in that order)
LikeLike
You are correct. It should be in the order EAX, EDX, ECX. It is wrong in the text, but correct in the examples…
LikeLike
Hello Erik
Congratulations on the article, could you show a simple example of how to apply SIMD in bitmap manipulation a simple example just to illustrate my mind on how to do this?
I have a simple example of making the pixels negative
procedure InvertColor(ABitmap: TBitmap);
var
i: Integer;
m: TBitmapData;
p: PAlphaColor;
begin
if ABitmap.Map( TMapAccess.ReadWrite, m ) then
begin
p := m.GetPixelAddr( 0, 0 );
for i := 0 to Pred( ABitmap.Height * ABitmap.Width ) do
begin
p^ := p^ xor $00FFFFFF;
Inc( p );
end;
ABitmap.Unmap( m );
end;
end;
It would be nice if you could create an article teaching how to speed up image processing with SIMD 🙂
Thanks.
LikeLike
You can try out the following example for Win32:
// NOTE: This only works for 32-bit Windows!
procedure InvertColorSimd(const AData: Pointer; AWidth, AHeight, APitch: Integer);
//                              eax             edx     ecx
const
  INVERT: array [0..3] of Cardinal = ($00FFFFFF, $00FFFFFF, $00FFFFFF, $00FFFFFF);
asm
  { Preserve any registers that should not be modified. }
  push   ebx
  push   esi
  push   edi

  { The first 3 parameters are passed in registers.
    Any other parameters must be loaded from the stack. }
  mov    ebx, APitch

  { Preparation: set xmm7 to value $00FFFFFF repeated 4 times. }
  movdqu xmm7, [INVERT]

  { XMM registers are 16 bytes wide, so can contain 4 color values.
    To improve parallelism, we use 2 XMM registers so 8 colors at once.
    So if AWidth is not a multiple of 8, then the final 1-7 pixels in each row
    are left unmodified. You could do these manually using Delphi code.

    Divide AWidth by 8 to get the number of 8-pixel segments to convert }
  shr    edx, 3
  mov    edi, edx          // Copy edx to edi (to restore later)

  { APitch is the number of bytes between 2 rows. This is not always equal to
    AWidth * 4 and could even be negative. Calculate the number of bytes to
    advance after we have converted one row of pixels. For example, say AWidth
    is 300 and APitch is 1300. Since we convert 8 pixels at once, this means
    we can only convert 296 (37*8) pixels per row, which is 296*4=1184 bytes,
    which is the same as 37*32. Since APitch is 1300, we need to advance an
    additional 1300-1184=116 bytes after each row. }
  mov    esi, edx
  shl    esi, 5            // Multiply by 32 to get #bytes per row
  sub    ebx, esi          // ebx is number of bytes to advance after row

  { Load 8 pixels (you can use the faster movdqa instead if you are sure that
    AData is 16-byte aligned) }
@@Invert8Pixels:
  movdqu xmm0, [eax]       // 4 pixels
  movdqu xmm1, [eax + 16]  // Next for pixels
  pxor   xmm0, xmm7        // XOR with $00FFFFFF (for 4 pixels)
  pxor   xmm1, xmm7        // Same for other 4 pixels
  movdqu [eax], xmm0       // Store resulting 4 pixels
  movdqu [eax + 16], xmm1  // And next for pixels

  add    eax, 32           // Advance to next 8 pixels in AData
  sub    edx, 1            // Loop until all 8-pixel segments in row are done
  jnz    @@Invert8Pixels

  mov    edx, edi          // Restore edx from edi copy
  add    eax, ebx          // Add additional pitch to eax to advance to next row
  sub    ecx, 1            // Loop until all rows are done
  jnz    @@Invert8Pixels

  { Restore preserved registers (in opposite order) }
  pop    edi
  pop    esi
  pop    ebx
end;

procedure InvertColor(const ABitmap: TBitmap);
var
  Data: TBitmapData;
begin
  if (ABitmap.Map(TMapAccess.ReadWrite, Data)) then
  try
    InvertColorSimd(Data.Data, Data.Width, Data.Height, Data.Pitch);
  finally
    ABitmap.Unmap(Data);
  end;
end;
With the help of this blogpost and plenty of resources on the internet, you should be able to convert this for other platforms😉
Note that for FireMonkey, this code only works correctly for fully opaque bitmaps because FireMonkey expects bitmap to be alpha-premultiplied.
LikeLike
Hello Erik van Bilsen
Thank you very much for your generosity in sharing your knowledge with me.
Have a wonderful day.
LikeLike
I did some experimentation with SIMD and assembler, but using Doubles instead of singles. The result was good and the function performs better than the normal code generated by the Delphi compiler. However, assembler functions can’t be inlined. In my real application the faster non-inlined functions written in assembler and using SIMD perform worse than the inlined Delphi functions.
So, although it was a good learning, the end result is basically useless in production. Too bad that Delphi compiler can’t inline the assembler functions.
Regards
LikeLike
I wouldn’t say the result is useless in production. It mostly depends on the size of your assembly routines. For very short routines, the overhead of a function call can negate the performance gains. But (slightly) longer routines can benefit a lot from SIMD assembly. Take a look at my FastMath library (https://github.com/neslib/FastMath) for some real and big performance gains.
LikeLike