
Android and iOS have built-in support for detecting faces in photos. We present a small platform-independent abstraction layer to access this functionality through a uniform interface.
You can find the source code on GitHub as part of our JustAddCode repository.
Like we did in our post on Cross Platform Text-to-Speech, we expose the functionality through a Delphi object interface. The implementation of this interface is platform-dependent. This is a common way to hide platform-specific details, and one of the ways we discussed in our post on Cross Platform Abstraction.
IgoFaceDetector API
The interface is super simple:
type
  IgoFaceDetector = interface
    function DetectFaces(const ABitmap: TBitmap): TArray<TgoFace>;
  end;
There is only one method. You provide it with a bitmap of a photo that may contain one or more faces, and it returns an array of TgoFace records for each detected face. This record is also pretty simple:
type
  TgoFace = record
    Bounds: TRectF;
    LeftEyePosition: TPointF;
    RightEyePosition: TPointF;
    EyesDistance: Single;
  end;
It contains a rectangle into the bitmap that surrounds the face, as well as the position in the bitmap of the two eyes and the distance between the eyes (in pixels). Sometimes, one or both eyes cannot be reliably detected. In that case, the positions will be (0, 0) and the distance between the eyes will be 0.
To create a face detector, call the TgoFaceDetector.Create factory function:
type
  TgoFaceDetector = class // static
  public
    class function Create(
      const AAccuracy: TgoFaceDetectionAccuracy = TgoFaceDetectionAccuracy.High;
      const AMaxFaces: Integer = 5): IgoFaceDetector; static;
  end;
The parameters are optional. The AAccuracy parameter lets you trade off face detection accuracy for speed. You can choose between Low and High accuracy, which will be faster and slower respectively. This parameter is only used for iOS. On Android, you cannot specify an accuracy. Also, you can specify the maximum number of faces to detect in a photo using the AMaxFaces parameter. Again, higher values increase detection time. If you want to do real-time face detection using the built-in camera, then you probably want to set this parameter to 1.
That’s all there is to it. Our GitHub repository has a little sample application that runs the face detector on a set of photographs. This is what the result looks like on iOS and Android:

The face detection capabilities are different for both platforms. In general, the iOS version is able to detect more faces (or with higher accuracy) than the Android version.
Null Implementation
This post is about face detection on Android and iOS only since they have built-in support this. On other platforms, you can use libraries like OpenCV the create similar functionality, but that is not as straight-forward and outside the scope of this article.
However we don’t want you to add {$IFDEF‘s everywhere in your code to exclude the face detector on other platforms. So, there is also a null (or no-op) implementation of the IgoFaceDetector interface that does nothing and just returns an empty array of faces:
type
  TgoFaceDetectorImplementation = class(TInterfacedObject, IgoFaceDetector)
  protected
    { IgoFaceDetector }
    function DetectFaces(const ABitmap: TBitmap): TArray<TgoFace>;
  end;

function TgoFaceDetectorImplementation.DetectFaces(
  const ABitmap: TBitmap): TArray<TgoFace>;
begin
  Result := nil;
end;
This implementation is used for all platforms except iOS and Android.
iOS Implementation
On iOS, face detection functionality is available as part of the CoreImage framework. You need to create two objects: one of type CIContext and one of type CIDetector:
constructor TgoFaceDetectorImplementation.Create(
  const AAccuracy: TgoFaceDetectionAccuracy; const AMaxFaces: Integer);
var
  Options: NSDictionary;
  Value: Pointer;
begin
  inherited Create;
  FMaxFaces := AMaxFaces;

  FContext := TCIContext.Wrap(TCIContext.OCClass.contextWithOptions(nil));
  FContext.retain;

  if (AAccuracy = TgoFaceDetectionAccuracy.Low) then
    Value := CIDetectorAccuracyLow
  else
    Value := CIDetectorAccuracyHigh;
  Options := TNSDictionary.Wrap(TNSDictionary.OCClass.dictionaryWithObject(
    Value, CIDetectorAccuracy));

  FDetector := TCIDetector.Wrap(TCIDetector.OCClass.detectorOfType(
    CIDetectorTypeFace, FContext, Options));
  FDetector.retain;
end;
The context is created with default options using the contextWithOptions “class” function. Whenever you create an Objective-C object using one of these “class” functions (instead of using a constructor), then the returned object is a so-called auto-release object. This means that the object will be destroyed automatically at some point unless you retain a reference to it. So we need to call retain to keep the object alive, and call release once we no longer need the object (which is done inside the destructor).
A similar model is used to create the detector object. You pass a dictionary with detection options. In this case, the dictionary contains just a single option with the detection accuracy. You also need to specify the type of detector you require. In our example, we want a face detector, but you can also create a detector to detect text or QR codes for example.
The code to actually detect the faces is a bit more involved, but not too bad:
function TgoFaceDetectorImplementation.DetectFaces(
  const ABitmap: TBitmap): TArray<TgoFace>;
var
  ...
begin
  { Create a CIImage with the contents of our FireMonkey bitmap. }
  if (not ABitmap.Map(TMapAccess.Read, SrcData)) then
    Exit(nil);
  try
    Data := TNSData.Wrap(TNSData.OCClass.dataWithBytes(SrcData.Data,
      SrcData.Width * SrcData.Height * SrcData.BytesPerPixel));
  finally
    ABitmap.Unmap(SrcData);
  end;

  { Now we can create a CIImage using this data. }
  Size.width := ABitmap.Width;
  Size.height := ABitmap.Height;
  Format := kCIFormatBGRA8;
  Image := TCIImage.Wrap(TCIImage.OCClass.imageWithBitmapData(Data,
    ABitmap.Width * 4, Size, Format, nil));

  { Pass the image to the face detector. }
  Features := FDetector.featuresInImage(Image, nil);
  if (Features = nil) then
    Exit(nil);

  { Convert the CIFaceFeature objects to TgoFace records. }
  Count := Min(Features.count, FMaxFaces);
  SetLength(Result, Count);

  for I := 0 to Count - 1 do
  begin
    SrcFeature := TCIFaceFeature.Wrap(Features.objectAtIndex(I));

    { Calculate the face bounds. }
    R := SrcFeature.bounds;
    DstFace.Bounds.Left := R.origin.x;
    DstFace.Bounds.Top := ABitmap.Height - R.origin.y - R.size.height;
    DstFace.Bounds.Width := R.size.width;
    DstFace.Bounds.Height := R.size.height;

    { Convert the eye positions. }
    if (SrcFeature.hasLeftEyePosition) then
    begin
      P := SrcFeature.leftEyePosition;
      DstFace.LeftEyePosition := PointF(P.x, ABitmap.Height - P.y);
    end
    else
      DstFace.LeftEyePosition := PointF(0, 0);

    if (SrcFeature.hasRightEyePosition) then
    begin
      P := SrcFeature.rightEyePosition;
      DstFace.RightEyePosition := PointF(P.x, ABitmap.Height - P.y);
    end
    else
      DstFace.RightEyePosition := PointF(0, 0);

    { Calculate the distance between the eyes manually. }
    DstFace.EyesDistance := DstFace.LeftEyePosition.Distance(DstFace.RightEyePosition);

    Result[I] := DstFace;
  end;
end;
The first step is to convert the given FireMonkey bitmap to a CoreImage bitmap that the detector can handle. This involves creating an NSData object with the raw bitmap data, and passing that data to the imageWithBitmapData “class” function of CIImage.
This is another case where we use “class” functions to create Objective-C objects. But in this case, the
NSDataandCIImageobjects are only used for the duration of theDetectFacesmethod. So we don’t have to useretain(andrelease) to keep the objects alive.
Next, the image is passed to the featuresInImage method of the detector, which returns an NSArray of CIFaceFeature objects. The last half of the code above just converts these CIFaceFeature objects to TgoFace records. To only caveat is that CIImage objects store bitmaps in bottom-up order, so they are upside-down compared to FireMonkey bitmaps. So in the code above, vertical coordinates are subtracted from the bitmap height to compensate for this.
Android Implementation
The process on the Android side is not that different, just the details. You need to create a JFaceDetector Java object. You call its findFaces method, passing a Java JBitmap object and a (Java) array of JFaceDetector_Face objects.
The type name
JFaceDetector_Facemeans that theFaceDetectorclass has a nested class type calledFace. In Delphi, these get combined into a top-levelJFaceDetector_Faceclass.
A complicating factor is that the Java bitmap must be in RGB565 format. This means 16 bits per pixel, using 5 bits for the red and blue components and 6 bits for the green component (since the human eye is more sensitive to greens). The FireMonkey bitmap is in 32-bit RGBA format, so we need to convert it. This is what the first half of the DetectFaces implementation does:
function TgoFaceDetectorImplementation.DetectFaces(
  const ABitmap: TBitmap): TArray<TgoFace>;
var
  ...
begin
  { Android's FaceDetector class requires Width to be even }
  Width := ABitmap.Width;
  OddWidth := Odd(Width);
  if (OddWidth) then
    Dec(Width);
  Height := ABitmap.Height;

  { Use previously cache FaceDetector class if available and dimensions
    haven't changed. }
  if (FDetector = nil) or (Width <> FWidth) or (Height <> FHeight) then
  begin
    FDetector := nil;
    FWidth := Width;
    FHeight := Height;
    FDetector := TJFaceDetector.JavaClass.init(Width, Height, FMaxFaces);
  end;

  { The FaceDetector class works with the Android Bitmap class.
    FaceDetector requires that the bitmap is in 565 format }
  Bitmap := TJBitmap.JavaClass.createBitmap(Width, Height,
    TJBitmap_Config.JavaClass.RGB_565);
  BitmapId := (Bitmap as ILocalObject).GetObjectID;

  { Use NDK AndroidBitmap APIs for fast access to native Android bitmaps. }
  if (AndroidBitmap_lockPixels(TJNIResolver.GetJNIEnv, BitmapId, @Dst) <> 0) then
    Exit(nil);
  try
    { Copy the FireMonkey bitmap to the native Android bitmap,
      converting to RGB565 format in the process. }
    if (not ABitmap.Map(TMapAccess.Read, SrcBitmap)) then
      Exit(nil);
    try
      Src := SrcBitmap.Data;
      for Y := 0 to Height - 1 do
      begin
        for X := 0 to Width - 1 do
        begin
          C := Src^;
          R := (C shr (16 + 3)) and $1F; // 5 bits
          G := (C shr ( 8 + 2)) and $3F; // 6 bits
          B := (C shr ( 0 + 3)) and $1F; // 5 bits
          Dst^ := (R shl 11) or (G shl 5) or B;
          Inc(Src);
          Inc(Dst);
        end;
        if OddWidth then
          Inc(Src);
      end;
    finally
      ABitmap.Unmap(SrcBitmap);
    end;
  finally
    AndroidBitmap_unlockPixels(TJNIResolver.GetJNIEnv, BitmapId);
  end;
  ...
end;
The top half creates a JFaceDetector object. The only caveat here is that the image width needs to be even.
The remainder of the code converts the FireMonkey bitmap to a Java JBitmap in RGB565 format. Working with Java bitmaps can be time consuming. It is much faster to use the AndroidBitmap APIs from the NDK instead. These APIs provide native access to the underlying pixels in a Java bitmap. The AndroidBitmap_lockPixels API gives us access to these pixels, in a similar way that TBitmap.Map gives access to the pixels in a FireMonkey bitmap. The bulk of the code converts each 32-bit pixel in the FireMonkey bitmap to a 16-bit pixel in the Java bitmap. The following diagram may clarify the conversion:
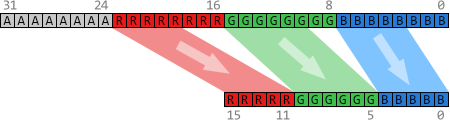
Some bit shuffling is used to copy the most significant bits from the red, green and blue components of each 32-bit pixel, and pack them into a 16-bit pixel.
Once we have the Java bitmap, the remainder of the code is more trivial:
  ...
  { Create a Java array of JFaceDetector_Face objects. }
  Faces := TJavaObjectArray<JFaceDetector_Face>.Create(FMaxFaces);
  { Pass this array to the SrcFace detector to find the faces. }
  Count := FDetector.findFaces(Bitmap, Faces);
  if (Count = 0) then
    Exit(nil);

  { Convert the JFaceDetector_Face objects to TgoFace records. }
  SetLength(Result, Count);
  Point := TJPointF.Create;
  for I := 0 to Count - 1 do
  begin
    { Get Java SrcFace from array }
    SrcFace := TJFaceDetector_Face.Wrap(Faces.GetRawItem(I));
    SrcFace.getMidPoint(Point);
    P.X := Point.x;
    P.Y := Point.y;
    Distance := SrcFace.eyesDistance;

    { Calculate the position of the eyes based on the mid point of the SrcFace
      and the distance between the eyes.
      NOTE: We should use SrcFace.pose to rotate the position of the eyes around
      the midpoint. However, on most Android devices, Pose always returns 0,
      so there is not much point in using it. }
    DstFace.LeftEyePosition := PointF(P.X - 0.5 * Distance, P.Y);
    DstFace.RightEyePosition := PointF(P.X + 0.5 * Distance, P.Y);
    DstFace.EyesDistance := Distance;

    { Android does not return the bounds of the SrcFace. Instead, we set it
      ourselves based on the eye positions. We set it in such a way to match
      the way iOS does it. }
    Distance := Distance * 1.35;
    DstFace.Bounds := RectF(P.X - Distance, P.Y - 0.7 * Distance,
                            P.X + Distance, P.Y + 1.3 * Distance);
    Result[I] := DstFace;
  end;
end;
We need to create a Java bridge array of JFaceDetector_Face objects and pass it to the JFaceDetector.findFaces method, together with the bitmap. After that, again it becomes just a matter of converting these JFaceDetector_Face objects to TgoFace records. There are some differences compared to the iOS version though.
First, the Android version does not give us the position of the eyes. Instead, it gives us the midpoint between the eyes and the distance between the eyes. Using this information, we can calculate the eye positions ourselves. A complicating factor is that we should rotate the eye positions based on a “pose” angle. However, on the Android devices I have tested this on, the pose angle is always 0 degrees, so we can simplify the eye position calculations.
Also, the Android version does not give us the the bounding box for the entire face. So we calculate (or actually estimate) this bounding box ourselves using the midpoint between the eyes and the “normal” proportions of the human face. The calculation was created using some trial-and-error to get similar results to the iOS version.
Finishing Up
Face detection doesn’t have to be difficult; especially if the operating system has built-in support for it. It becomes a bit more challenging if you want to perform real-time face detection on a live webcam stream, for example to implement face tracking or fancy filter effects. But the principles will remain the same.

hi,
from your demo,
I’ve tested on my machine 32bit for windows delphi berlin but doesn’t detect any face from your given image.
LikeLike
The demo only works on Android and iOS. As the article mentions, on other platforms a no-op version is used that doesn’t do anything.
LikeLike
I’m sorry, cause I run it directly when it loads using .dproj, without seeing it was default to win32 debug application, so I Activate to android and it runs good on Pictures, but I hope this can be used for live camera face detection. Thank you and good Luck for the update 😀
LikeLike
hi,
how do we get the rectangle of the faces? I mean each person image face how do we get copy to a list? what function should we update or change or add?
LikeLike
I don’t know exactly what you mean. The
DetectFacesmethod already returns a list (array) ofTgoFacerecords. You can add the Bounds value of that record to aTList<TRectF>or whatever.If you want a single rectangle surrounding ALL faces, then you can use
TRectF.Union, as in:Faces := MyFaceDetector.DetectFaces(MyBitmap); if (Faces <> nil) then begin Bounds := Faces[0].Bounds; for I := 1 to Length(Faces) - 1 do Bounds.Union(Faces[I].Bounds); end;LikeLike
Actually we want to get out or cut or copy the rectangle faces to be on a list of faces. Like when we do face recognition that we only need the rectangle face and not including the body or the entire picture. How do we do that?
LikeLike
OK. You can use
TBitmaporTCanvasfor that. You can create a newTBitmapwith the dimensions of a face rectangle, and then useTBitmap.CopyFromBitmapto copy a segment from the original bitmap to your new bitmap. Or you can use theCanvasproperty of a bitmap and use itsDrawBitmapmethod to copy pieces of bitmaps around.Please see the (documentation of the)
TBitmapandTCanvasclasses for more information on this.LikeLike
Thank you sooooooooo much 😀
LikeLiked by 1 person
and I think what I mean is crop the faces to list or listview
LikeLike
Like when we do look recognition that we only pauperization the rectangle look and not including the physical structure or the full photo. DetectFaces(MyBitmap);
if (Faces <> nil) then
get
Bounds := Faces[0].
LikeLike
Hi, thank you very much. I Have a question, is it possible to compare two photos to match faces?.
Best regards
LikeLike
That is more about face recognition than face detection. This is not possible with the APIs described in this post. You would need another solution for this that requires much more sophisticated AI…
LikeLike
Hi
do you have same codes implimented to c++ builder ? I would be really grateful if you have as converting codes from delphi might be challenging sometimes as i dont know a out pascal syntax.
LikeLike
Sorry, but I am not proficient in C++ (builder). But I assume there is more C(++) sample code available on the internet than Delphi code. You may also be able to get it to work with the explanation in the blog post and the official iOS and Android documentation.
LikeLike
Hi! Is it possible to use the face detection just as background process? E.g. to check if profile pictures contain a face. So a picture could be rejected automatically if there is no face in the picture.
LikeLike
You could probably create your own background thread to do this. Be careful with passing TBitmap objects to this thread though, since TBitmap usually requires the be handled in the main thread. You could assign the bitmap to a TBitmapSurface though, which doesn’t have this restriction.
LikeLike
Good morning, would you be able to detect gestures or emotions? If yes how would you do it?
LikeLike
No, the frameworks used in this article only detect faces in images. There may be other libraries out there that provide what you are looking for.
LikeLike