
We show how you can use Delphi’s new 64-bit macOS compiler toolchain to link 3rd party static libraries and your own assembly code. We also look into some common linking errors you may run into and how to fix them.
LLVM based Compiler and Linker
Like all recent Delphi compilers, the new Delphi compiler for 64-bit macOS (called macOS64 from now on) is built on top of the LLVM. This provides some great new possibilities, but also means that certain this work different now compared to the 32-bit (non-LLVM) macOS compiler.
One of the things that is not supported anymore is inline assembly language. Like the other LLVM based Delphi compilers, you need to use an external assembler now. Fortunately, this isn’t very complicated (provided you are familiar with 64-bit assembly code), and I’ll show you how to do this in the second half of this post.
A big advantage of using the LLVM toolchain, is that you are now able to link static libraries into your macOS64 app. With the 32-bit compiler, you can only link object files or use dynamic libraries (dylibs). I much prefer to use static libraries instead for easier deployment and to avoid versioning issues.
Static Libraries
The way you use static libraries for macOS64 is the same as for iOS and Android. Usually, it suffices to change the library name inside a {$IF Defined(MACOS64)} section and clear any API name prefix. For example, we updated our Duktape for Delphi library to support macOS64 by making these changes:
const
  ...
  {$ELSEIF Defined(MACOS32)}
  LIB_DUKTAPE = 'libduktape_osx32.dylib';
  PREFIX = '_';
  {$ELSEIF Defined(MACOS64)}
  LIB_DUKTAPE = 'libduktape_osx64.a';
  PREFIX = '';
  {$ELSE ...}
On macOS32, a dynamic library (.dylib) is used and every imported API starts with an underscore (_). On macOS64, a static library (.a) is used and there is no need for an API prefix. Everything else stays the same. For example, an API is still imported in Delphi like this:
procedure duk_suspend(ctx: PDukContext; state: PDukThreadState);
  cdecl external LIB_DUKTAPE name PREFIX + 'duk_suspend';
Of course, you still need to build your static library. The documentation of your 3rd party library usually mentions how to do that. For the Duktape library, we created a custom shell script (BuildMacOS.sh) that you can find in its repository.
Dealing with Linker Errors
The LLVM based linker is a bit stricter than you may be used to for Windows or macOS32. It needs to be able to resolve all dependencies at compile-time. As a result, you may run into linker errors that you would’t get for macOS32. These are the same kind of linker errors you may have dealt with before on iOS and Android, so you may already know how to fix them. However, here is a refresher on some common errors (as I have encountered them) and how to fix them.
If you have a better or easier way to fix these problems, then I would very much like to know. So please drop a comment with your solution!
Missing Framework
You receive a linker error like:
ld: file not found: /System/Library/Frameworks/AudioUnit.framework/AudioUnit
This means you need to import the framework in the SDK manager. The steps to do this are a bit cumbersome, but this is how I usually do it:
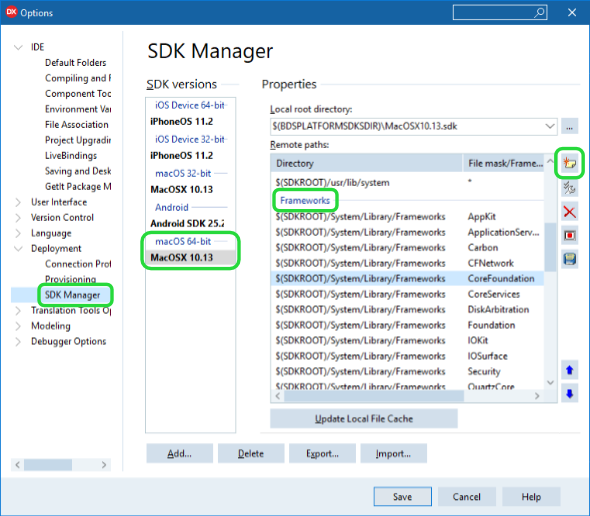
- Open the SDK Manager (Tools | Options… | Deployment | SDK Manager) and select your MacOSX SDK.
- In the list view on the right, scroll to the “Frameworks” section and double-click on any of the frameworks.
- Copy the text in the “Path on remote machine” edit box to the clipboard and cancel the dialog box. The edit usually displays
$(SDKROOT)/System/Library/Frameworks. - While you have still selected a framework in the “Frameworks” section, click the “Add a new path item” button on the right. You need to be inside the “Frameworks” section to add a new framework!
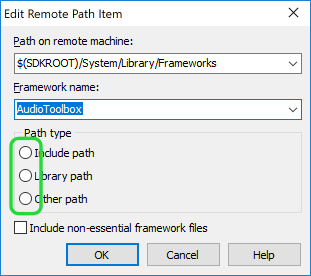
- In the dialog box that appears, paste the text you copied earlier into the “Path on remote machine” edit box, and enter the name of the framework (“AudioUnit” in this example) in the “Framework name” edit box.
- Important: make sure none of the radio buttons under “Path type” are checked, and press the “OK” button.
- Don’t forget to press the “Update Local File Cache” button at the bottom of the list.
Framework is not Linked
After you fixed the “missing framework” issue mentioned above, you receive a linker error like:
Undefined symbols for architecture x86_64:
Error: "_AudioUnitSetProperty", referenced from: ...
Even though the framework is available now, the linker will not link to it because none of the APIs in the framework are actually used by your app.
The way I usually fix this is by importing any API from this framework. This will force the linker to link to the framework. For example:
{$IFDEF MACOS64}
const
  libAudioUnit = '/System/Library/Frameworks/AudioUnit.framework/AudioUnit';

procedure _AudioUnitDummy; cdecl;
  external libAudioUnit name 'AudioUnitSetProperty';
{$ENDIF}
The library constant contains the full path of the framework (as imported into the SDK Manager earlier). Next I declare a dummy parameter-less procedure that links to an API in the framework. You can pick any API. I picked the one from the linker error message in this example. Note that this dummy procedure is never actually called. It is only used to force the linker to link the framework. You should never call this dummy procedure. (I started it with an underscore to discourage you from calling it).
Missing Runtime Library Dependency
You receive a linker error like:
Undefined symbols for architecture x86_64:
Error: "__ZNSt3__113basic_ostreamIcNS_11char_traitsIcEEED2Ev", referenced from: ...
When you get this kind of “Undefined symbols” error, your are missing a dependency to another library. The long mangled symbol name in this example refers to the basic_ostream class in the C++ standard library. This means we need to link to libc++ in this case. There are two ways to do this.
The first is to add a linker option to your project:
- Open the “Project | Options…” dialog box and navigate to “Building | Delphi Compiler | Linking”
- Select the “All Configurations – macOS 64-bit platform” target
- Set the “Options passed to the LD linker” property to
-lc++
The -l option instruct the linker to link an external library. The name of the library follows, without a space and without the “lib” prefix.
However, this method requires you to change the project options for each project that needs the dependency. A way to add the dependency automatically is by adding the dependency keyword to one of the API imports in the source code. For example:
procedure foo; cdecl external LIB_FOO name PREFIX + 'foo'
  {$IFDEF MACOS64}dependency 'c++'{$ENDIF};
Make sure to pick an API that you always use, otherwise the linker will smart-link it out of your app and ignore the dependency. Usually, many 3rd party APIs have some entry point functions that are always needed, so you can attach your dependency to any (or all) or these. Again, you omit the “lib” prefix.
Using Assembly Code
If you have been using the inline assembler for macOS (or Windows), then you will find that this does not work anymore for macOS64. In the remainder of this post I will show you how to use an external assembler instead, how to link to the assembled object files and what the main differences are between the 64-bit calling conventions on Windows and macOS.
I will explain all concepts using this sample assembly file called sample.asm:
BITS 64

section .text

global _add_simd

_add_simd: ; (const A, B: T16Bytes; out C: T16Bytes);
           ;      rdi  rsi              rdx
  movdqu  xmm0, [rdi]     ; Load A into xmm0
  movdqu  xmm1, [rsi]     ; Load B into xmm1
  paddb   xmm0, xmm1      ; xmm0 := xmm0 + xmm1 (16 times)
  movdqu  [rdx], xmm0     ; Store xmm0 into C
  ret
This example is taken from my SIMD Assembly Optimization post, but modified for macOS64. It takes the 16 bytes in parameter A, adds to each byte the corresponding byte in parameter B and stores the resulting 16 bytes in parameter C. I will not go into assembly language details here. Please refer to the SIMD Assembly post or other resources to learn more about assembly and SIMD instructions.
The top of the file is mostly boilerplate. BITS 64 instructs the assembler to generate 64-bit code. The section .text directive signals the beginning of an assembly code section. You can also add a section .data directive to start a data section. Finally, the global directive is used to tell the assembler which symbols to export, so we can access them from Delphi. You need to start each global symbol with an underscore to make them visible to Delphi. After this header follows the actual assembly code for the _add_simd routine.
Assembling the Code
There are various ways you can assemble this code into an object file or static library. You could use the Clang toolchain on you Mac computer, or use an external assembler. I prefer the second option since it is easy to run on Windows and you don’t need to setup a complete compiler toolchain. I highly recommend the Netwide Assembler (NASM). It is just a single executable (nasm.exe), supports a lot of outputs format (including macOS64) and has a powerful macro feature.
To assemble the sample.asm file we created earlier, you just execute:
nasm -f macho64 sample.asm -o sample.obj
The -f flag specifies the output format. You need to set it to macho64 to generated an object file that can used with Delphi for macOS64. Other than that, you pass the name of your input and output file. Can’t get much simpler than that.
Linking the Object File in Delphi
If you have used object files before, you probably know you use the {$LINK ...} directive to link them into your app. However, that only works for the non-LLVM linkers. For the LLVM based macOS64 linker, you can treat an object file the same as a static library. So the _add_simd routine in the object file is imported like this:
type
  T16Bytes = array [0..15] of Byte;

procedure Add(const A, B: T16Bytes; out C: T16Bytes);
  external 'sample.obj' name 'add_simd';
A couple of things to note here:
- The
T16Bytestype is an array of 16 bytes. When you use aconstparameter with a type that is more than 8 bytes in size, then the Delphi compiler will pass a pointer to the data instead. When using avaroroutparameter, Delphi will always use a pointer. So the_add_simdroutine just treats all 3 parameters as pointers. - I am not declaring a calling convention (like
cdecl). All LLVM based compilers for Delphi use a fixed calling convention that cannot be changed (more about this later). You can still use thecdecldirective if you want, but it is not required. - You pass the name of the object file just as you would pass the name of a static library.
- The name of the imported routine (
add_simd) does not contain a leading underscore.
Calling Convention Differences
If you have written 64-bit assembly code for Windows before, then you will notice that the calling convention for 64-bit macOS is different. On Windows, the Microsoft x64 Calling Convention is used, while macOS uses the System V AMD64 ABI.
The following table summarizes some of the most common differences you may run into.
| Win64 | macOS64 | |
| Integral parameters | rcx, rdx, r8, r9 | rdi, rsi, rdx, rcx, r8, r9 |
| Floating-point parameters | xmm0-xmm3 | xmm0-xmm7 |
| Integral return value | rax | rax (64-bit) or rax, rdx (128-bit) |
| Floating-point return value | xmm0 | xmm0 (128 bits) xmm0, xmm1 (256 bits) |
| Must be preserved | rdi, rsi, rbx, rbp, rsp, r12-r15, xmm6-xmm15 | rbx, rbp, r12-r15 |
As you can see, the macOS64 calling convention is much easier to use for developers. Up to 14 parameters are passed in registers, compared to 8 for Win64. Also, most registers can be used freely and don’t have to be preserved. This means you usually don’t need any function prologues and epilogues. And when you do need them, they can be shorter and simpler.
Some things to keep in mind:
- If your assembly function doesn’t call any other functions (that is, it is a “leaf-node function”), then you can freely use the 128 bytes below the stack pointer (known as the “red-zone”).
- When using a data segment (
section .data) you can align it to a 16-byte boundary (by specifyingALIGN 16). You can then use aligned memory load instructions (likemovdqaandmovaps) to load data from this segment, which is usually faster than using unaligned instructions (likemovdquandmovups). - However, you cannot assume that function parameters are also 16-byte aligned. So you must use unaligned instructions to access these.
For a wide variety of macOS64 assembly routines, take a look at my personal FastMath project, which I recently updated to support macOS64.

Microsoft x64 ABI passes only 4 parameters in registers, not 8 !
Depending on types:
parameter1 RCX / XMM0
parameter2 RDX / XMM1
parameter3 R8 / XMM2
parameter4 R9 / XMM3
https://docs.microsoft.com/en-us/cpp/build/x64-calling-convention?view=vs-2019
int test(int a, double b, int c, float d, int e)
{
return a+c+e + (int)b + (int) d;
}
MSVC 19.22 x64
int test( int, double, int, float, int)
cvttsd2si edx, xmm1
cvttss2si eax, xmm3
add ecx, edx
add eax, ecx
add eax, r8d
add eax, DWORD PTR e$[rsp] …. fifth int comes on the stack !
ret
// (rcx, xmm1, r8, xmm2, stack)
LikeLike
You are absolutely correct. Thanks for the correction and clarification!
LikeLike